Kubernetes has been a game changer when it comes to running containerized applications and offers an excellent platform for DevOps automation of things like deployment, scaling, and operations. Kubernetes can be run on cloud infrastructure. However, these runs are better off running k8s on the host. You do not need to be a master of Kubernetes to deploy on bare metal server in the way that this guide will show you: from understanding what Kubernetes does to creating a bare metal Kubernetes cluster.
Kubernetes is just so not restricted and has no limits amongst its ranks making it one of the first, if not THE first choice method to manage containerized workloads. It offers a single system view for deployment and orchestration by hiding the underlying complexity of containers. Kubernetes allows businesses to use resources in a more efficient way, automate the execution of tasks and provide redundancy of their applications, all while maintaining consistency across environments.
Kubernetes on bare metal, instead of deploying within the confines of a virtualized cloud infrastructure, uses several advantages: performance boost, cost-accountability and control over your physical hardware. By doing so eliminates the burden placed on the system by virtualization, enabling applications to run closer to hardware so they can be faster. Moreover, it allows higher security and compliance for example on-premise data would stay on-premises meaning regulatory compliances.
What is Kubernetes?
Kubernetes also known as K8s is an open-source platform for scheduling and running containerized applications. Kubernetes, initially authored by Google and is the most popular tool for managing containers. It gives you declarative configuration and automation so you can specify what you want your applications to run, and how they will be able to communicate with other services. Read our full article on what is kubernetes.
Functions of Kubernetes
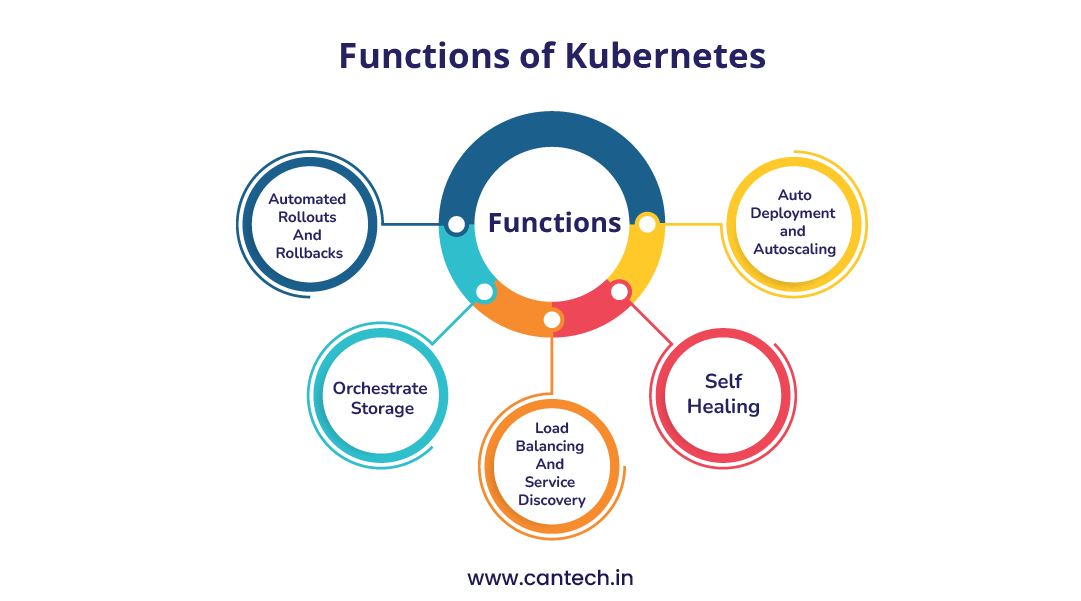
There is an abundant list of features in Kubernetes making it very critical to have in your toolbox for modern application deployment:
- Auto-Deployment and Autoscaling: Kubernetes can automatically deploy and scale your apps according to specified configurations in instances.
- Self-Healing: It can restart faulty containers, autoreplace containers and kill other containers which are not responding by unhealthy check.
- Load Balancing And Service Discovery: Kubernetes can expose a container by its DNS name or even their own IP address and load balance to attempt to stabilize the deployment.
- Orchestrate Storage: Kubernetes is all the way capable of automatically mounting your preferred storage system (local, cloud providers, etc) without you having to write anything.
- Automated Rollouts And Rollbacks: Kubernetes automates the rollouts and rollbacks of your application release so you can deploy modern practices with greater ease, and have a fail-safeway to rollback in case of an inline change.
What are Bare Metal Kubernetes?
Bare-metal Kubernetes refers to the deployment of Kubernetes directly on physical servers, rather than on virtual machines or cloud instances. This approach offers several benefits, including better performance, lower latency, and more control over the hardware. However, it also comes with its own set of challenges, such as the need for manual hardware management and configuration.
Why Deploy Kubernetes on Bare Metal?
Performance
Running Kubernetes on bare metal provides maximum performance by getting rid of the hypervisor layer in VM instances. Hence, hardware resources are available to applications directly which results in less latency and high throughput. The performance benefits from bare metal are immense, if you require real time processing or fast data access like gaming servers or AI model training for example.
Bare-metal deployments also give you the ability to fully consume the hardware — unlike in a virtualized set up where you share among all your other users. The availability of this single resource, results in stable and predictable performance allowing it to be advantageous in any use case where the delay does not scale so crucially, like a mission-critical application.
Cost
It is easy to use cloud platforms for short-term projects, but the bare metal server price is typically cheaper over the long run for Kubernetes deployments that last. Physical servers whether rented or owned, this will take off the recurring price of the VMs instance and extra cloud based services as well. It can save a lot, particularly for businesses experiencing predictable and stable workloads.
Furthermore, with bare-metal servers, you pay for only what you use without hidden costs for storage or data transfer that often come with cloud environments. This cost transparency allows you to budget and manage your expenses in the long term, which makes an economically feasible solution for organizations.
Control
Bare metal Kubernetes deploys allow for the highest level of control over hardware configurations and administrators can build the environment around the specific workloads they need to deploy. You can pick the exact processor type, memory and storage according to your apps for best performance and utilization.
But this is also true for in-depth tuning of the software stack including everything from kernel level changes to network configuration. Overhead is rare in such flexible solutions when virtualized or in cloud environments since bare-metal still fits the bill for those who mandate top performance and must know exactly what their application is running on.
Security
Kubernetes on bare metal is vastly more secure due to the lack of shared infrastructure, offering a unique level of risk mitigation with bare metals. Bare-metal deployments are isolated from the physical servers, where multiple users share the same server in cloud environments giving us much less exposure to known vulnerabilities.
In addition bare metal also lets you plug-in whatever custom security you want to the life vest of your organization. End to end, from physical access controls to complex firewalls and encryption, you are liberated with your security stack and able to enact necessary regulatory processes for the sensitive information.
Prerequisites for Deploying Kubernetes on Bare Metal
Once you deploy Kubernetes on bare metal, make a note that first that you fulfill below prerequisites.
- You Need a Physical Server: First, you will need one physical server to be a master node and one or more servers for worker nodes
- Operating System: Installed on every server a proper Linux distribution Ubuntu, CentOS or Debian etc.
- Network Configuration: All servers need to be on the same network and able to reach each other.
- Required Hardware: Make sure your servers have the bare minimum of each type (CPU KIND, etc.,) needed to run Kubernetes.
How to Start The Set Up?
Step 1: Prepare the Servers
- Install the OS: Install a compatible Linux distribution on all servers. Ensure that the operating system is up-to-date.
- Setup Networking: All servers IPs to be static, and able to talk with each other.
- Comment on Swap: Kubernetes does not work with swap enabled. Swap can be disabled with,
/etc/fstab
file and running.
swapoff –a
- Install Docker: Kubernetes needs a container runtime. Docker is probably the most famous. Use the below commands to install Docker on all servers:
sudo apt-get update
sudo apt-get install -y docker.io
sudo systemctl start docker
sudo systemctl enable docker
Step 2: Installation of Kubernetes Components
- Install kubeadm, kubelet and kubectl: These will be required in order to setup your cluster with Kubernetes. On all servers, run the following commands:
sudo apt-get update && sudo apt-get install -y apt-transport-https curl
curl -s https://packages.cloud.google.com/apt/doc/apt-key.gpg | sudo apt-key add –
sudo bash -c ‘cat <<EOF >/etc/apt/sources.list.d/kubernetes.list
deb https://apt.kubernetes.io/ kubernetes-xenial main
EOF’
sudo apt-get update
sudo apt-get install -y kubelet kubeadm kubectl
sudo apt-mark hold kubelet kubeadm kubectl
Start kubelet: Ensure that the kubelet service is started and enabled on all servers:
sudo systemctl start kubelet
sudo systemctl enable kubelet
Initializing the Kubernetes Cluster
Step 3: Set up the Master Node
- Initialize kubeadm: Execute the command to initiate Kubernetes cluster in master node.
sudo kubeadm init –pod-network-cidr=10.244.0.0/16
- Set up kubeconfig: After initialization, set up the kubeconfig for the admin user:
mkdir -p $HOME/.kube
sudo cp -i /etc/kubernetes/admin.conf $HOME/.kube/config
sudo chown $(id -u):$(id -g) $HOME/.kube/config
- Install Pod Network: A pod network is needed on the Kubernetes to allow pods to talk to each other’s Install Flannel (as in, it is the most popular) Run command in master node:
kubectl apply -f https://raw.githubusercontent.com/coreos/flannel/master/Documentation/kube-flannel.yml
Step 4: Add Worker Nodes to the Cluster
- Get the Join Command: On the master node, run the following command to get the join command:
kubeadm token create –print-join-command
- Join Worker Nodes: On each worker node, run the join command obtained from the master node. For example:
sudo kubeadm join 192.168.1.100:6443 –token abcdef.0123456789abcdef –discovery-token-ca-cert-hash sha256:abcdef1234567890abcdef1234567890abcdef1234567890abcdef1234567890
Verifying the Kubernetes Cluster
Step 5: Verify the Cluster
- Check Node Status: On the master node, run the following command to check the status of all nodes:
kubectl get nodes
- You should see all nodes listed as
Ready
- Deploy a Test Application: Deploy a simple test application to verify that the cluster is functioning correctly. Create a deployment using the following command:
kubectl create deployment nginx –image=nginx
- Expose the Application: Expose the deployment as a service:
kubectl expose deployment nginx –port=80 –type=NodePort
- Access the Application: Get the node port assigned to the service and access the application using the node IP and port:
kubectl get services
You should see the
Nginx
service listed with a
NodePort
Access the application using
http://<node-ip>:<node-port>
Managing the Kubernetes Cluster
Step 6: Manage the Cluster
- Scale the Application: You can scale the application by adjusting the number of replicas. For example, to scale the
Nginx
deployment to 3 replicas:
kubectl scale deployment nginx –replicas=3
- Update the Application: To update the application, modify the deployment configuration and apply the changes:
kubectl set image deployment/nginx nginx=nginx:1.19.0
Monitor the Cluster: Use
Kubectl
commands to monitor the cluster. For example, to get the status of all pods:
kubectl get pods –all-namespaces
Step 7: Best Practices
- Best Practices: Ensure you are backing up your Kubernetes configuration and data often. Employ utilities such as Velero for the purpose of backup and restore.
- Monitoring and Logging: Implement monitoring and logging to keep track of the cluster’s health and performance. Tools like Prometheus and Grafana for monitoring, and Elasticsearch, Fluentd, and Kibana (EFK) for logging are popular choices. Enhanced security, which includes network policies, role-based access control (RBA) and penetration tests.
- K8s Production: In production environments, you can also set up a high availability k8s cluster with e.g. 3 master nodes.
- Keep Up-to-date: Run the latest Kubernetes cluster and components to enjoy all the new features, performance improvements and security fixes.
Troubleshooting Common Issues
Step 8: Troubleshooting
Node Not Ready: If a node is not in the
Ready
state, check the node’s status using
kubectl describe node <node-name>
Common issues include network configuration problems, insufficient resources, or kubelet errors.
- Pods Not Scheduling: If pods are not being scheduled, check the events using
kubectl get events
and describe the pod using
kubectl describe pod <pod-name>
Common issues include insufficient resources, taints and tolerations, or node affinity/anti-affinity rules.
- Networking Issues: If pods cannot communicate with each other, check the pod network configuration. Ensure that the pod network CIDR is correctly set and that the network plugin is functioning properly.
- DNS Resolution: If pods cannot resolve DNS names, check the CoreDNS configuration. Ensure that the CoreDNS pods are running and that the ConfigMap is correctly set up.
Advanced Topics
Step 9: Research Advanced Topics
- Advanced Networking: Since Flannel is an easy and simple network plugin, you might want to dive into Calico, Weave or Cilium for some advanced features.
- Kubernetes storage classes: You can use different kinds of storage with Kubernetes from a local one, network attached (NAS) or cloud based. Check out the different storage classes and dynamic provisioning so that you can satisfy your application needs.
- Service mesh: If your microservices architecture is more complex, take a look at service mesh solutions such as Istio and Linkerd to decouple service-to-service communication, security, observability.
- CI/CD Integration: To enable the automation of deploying and managing an application on top of your Kubernetes cluster, integrate your cluster with continuous integration and delivery (CI/CD) pipelines.
Conclusion
Finally, there can certainly be obstacles, but setting up Kubernetes on bare metal is an adventure that is worth doing. This document should have exceeded your expectations in terms of understanding what Kubernetes does, what bare metal k8s is and how to set up a bare metal Kubernetes cluster. If you are looking to improve performance, make your money objects go away faster, reduce cloud-infrastructure costs, and do so with the ideological permission to manage your own hardware then deploying Kubernetes on bare metal is quite the flexibility and power.
Take this right piece of advice, the most successful k8s deployment is covered with careful planning, testing and monitoring. By sticking to some of the lesser-known best practices and being current on Kubernetes development, you are able to deploy a large and high-performance bare-bones Kubernetes cluster that fits the needs of your organization.
FAQs
What are the prerequisites for deploying Kubernetes on bare metal?
Make sure you have enough hardware resources to deploy Kubernetes on bare metal, for example, modern CPUs servers, enough RAM & storage. You also require a reliable internet access, a Linux on top of it (Ubuntu & CentOS recommended) and kubectl, kubeadm in your tool box. You also need to deploy static IP addresses and DNS for cluster-infrastructure communication to be as smooth as possible. A successful deployment depends on having proper planning and resources.
Why should I choose bare metal over cloud platforms for Kubernetes?
Bare metal is great for scenarios that need high performance, cost-effectiveness and total hardware control. Bare-metal servers unlock the hardware resources of your server and avoid any virtualization overhead that cloud platforms come with. They are also low-cost for long-haul workloads and deliver additional security by bundling data from shared environments. Bare-metal deployments additionally provide more granular customization options for specific run- times like you might do in high-performance computing or very particular regulatory application environments.
What are the steps to set up a Kubernetes cluster on bare metal?
To deploy Kubernetes on bare metal, start by preparing your servers with a supported Linux OS and the necessary tools like kubectl, kubeadm, and a container runtime (e.g., Docker or CRI-O). Next, initialize the Kubernetes control plane using kubeadm init on the master node and join worker nodes to the cluster using the token generated during initialization. Install a networking solution, such as Calico or Flannel, to enable communication between pods. Finally, verify the setup by deploying test workloads and ensuring the cluster functions as expected.
What challenges can arise when deploying Kubernetes on bare metal?
Kubernetes on bare metal is a little hard to do, you need to do networking and manage storage, manage resources etc. Bare metal in contrast to cloud, there is no load balancers and storage out of the box available, all that needs to be manually configured. Without these automated cloud tools, it can be more difficult to keep high availability and cluster updates in check from the get-go. Still, with good planning and tools like MetalLB for load balancing, Rook to store the storage, issues can be mitigated.
How can I ensure the security of a bare-metal Kubernetes deployment?
Securing a Kubernetes cluster on bare metal requires physical and software level security mechanisms. First, restrict physical log in to servers and keep the operating system updated with the latest patches. If you take it one step further, use firewalls and network policies to manage pod to pod and pod to external traffic. Role-Based Access Control (RBAC) to handle permission management, and the encryption in transit and at rest of sensitive data. Lastly, keep an eye on the cluster for vulnerabilities in place and use tools such as kube-bench to test the security configurations.
